What if something growing in a forest, garden, or even your kitchen could release millions—or sometimes billions—of tiny reproductive cells into the air?
They are not insects. They are not seeds.
They are spores.
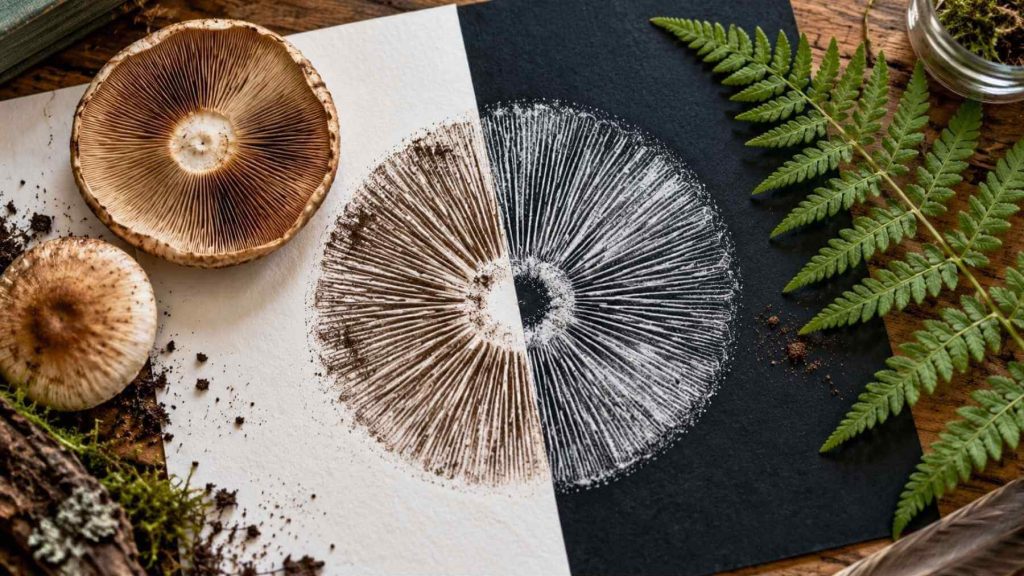
Spores are some of nature’s tiniest survival packages, and they are produced by organisms such as ferns, mosses, and fungi.
Most of the time, spores are far too small for us to see individually. But when thousands or millions of them collect in one place, something surprising happens.
They create a visible layer of fine, colorful dust.
And with a simple science activity, children can turn that invisible world into a beautiful piece of spore print art.
This activity is a wonderful way to combine plant science, observation, and art in one hands-on STEM lesson.
What Is a Spore?
Flowering plants usually reproduce using seeds.
A seed contains a tiny developing plant, called an embryo, along with stored food that helps it begin growing.
Ferns and mosses reproduce differently.
Instead of making flowers and seeds, they can produce spores.
Spores are extremely small reproductive cells. Unlike seeds, they do not contain a large supply of stored food. They depend heavily on finding the right environment—often one that is moist enough for development to continue.
That is one reason spore-producing organisms make huge numbers of spores.
Instead of investing lots of energy into a few large seeds, they produce enormous quantities of tiny reproductive cells that can be carried away by air or water.
You can think of it as a numbers game.
Most spores will never land in exactly the right place to grow. But producing millions of them increases the chance that at least some will reach a suitable habitat.
Where Are Fern Spores?
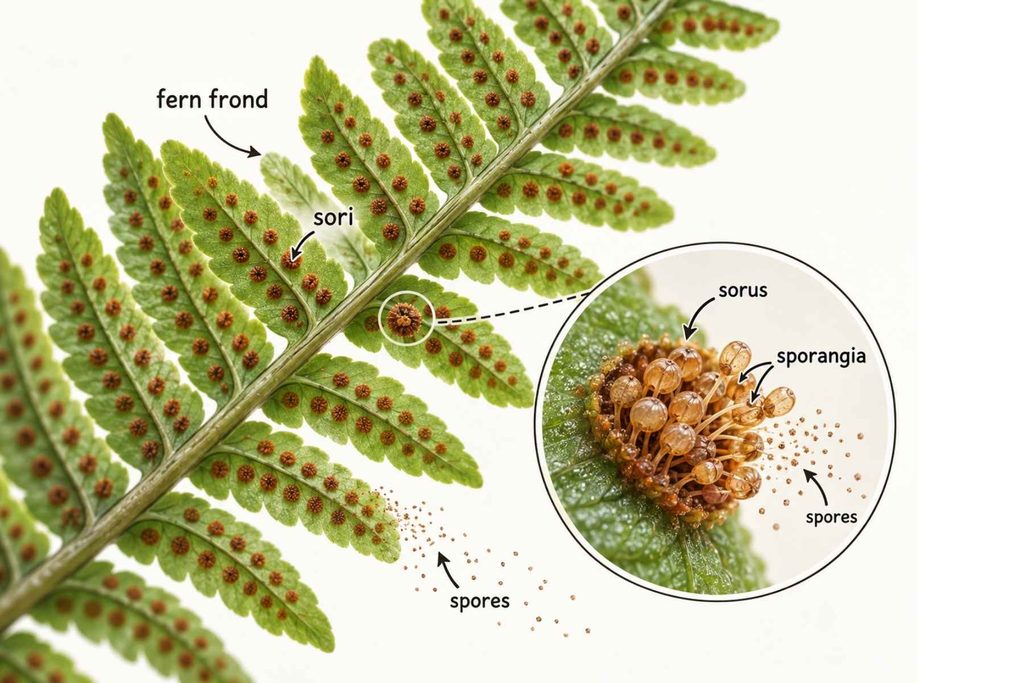
Have you ever turned over a fern frond and noticed rows of tiny brown or orange dots?
They may look like little spots of dirt, but they are actually part of the fern’s reproductive system.
These structures are called sori.
Each sorus contains tiny structures called sporangia, where spores are produced.
When the spores are mature, the sporangia release them.
The spores can then be carried away to new places.
It is an amazing process happening quietly beneath an ordinary-looking fern leaf.
Want to explore fern reproduction a little further?
If your students are curious about what happens after a fern releases its spores, my Fern Life Cycle Worksheets continue the lesson with a simple, kid-friendly look at the fern life cycle. Students can sequence the stages, learn key vocabulary, complete cut-and-paste activities, and discover how ferns grow without flowers or seeds.
Explore the Fern Life Cycle Worksheets →https://www.teacherspayteachers.com/Product/Fern-Life-Cycle-Worksheets-Plant-Life-Cycle-Spores-Cut-and-Paste-Science-16044849
How Can We See Something So Small?
A single spore can be microscopic.
You probably will not be able to see one without magnification.
But imagine thousands or millions of spores falling onto the same surface.
Suddenly, the invisible becomes visible.
Instead of seeing individual spores, you see a layer of extremely fine dust.
And because the spores fall directly beneath the structure that produced them, they can create surprisingly detailed patterns.
That is the science behind a spore print.
Fern Spores or Mushroom Spores?
You can try this experiment with an older fern frond with mature sori.
However, one of the easiest and most dramatic ways to make a spore print is with a mushroom.
There is one important science note for children:
Mushrooms are not plants.
They belong to their own biological kingdom: Fungi.
Ferns are plants, but both ferns and fungi reproduce using spores. Comparing the two can actually make this activity even more interesting.
A mushroom often creates an especially clear spore print because spores fall from structures beneath its cap, producing beautiful radiating patterns.
How to Make Spore Print Art
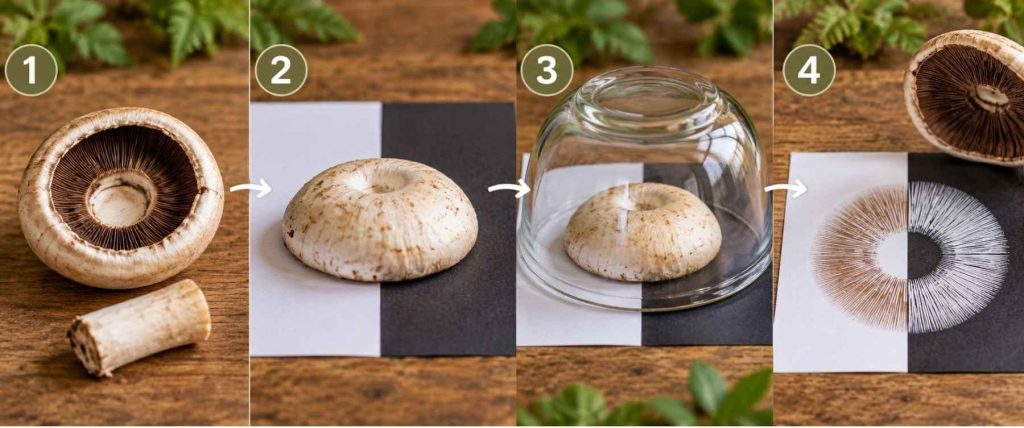
This simple experiment turns microscopic biology into something children can actually see—and keep.
You Will Need
- One mature fern frond with visible brown sori
OR - One fresh, open mushroom such as a store-bought button or portobello mushroom
- White paper
- Dark-colored paper, such as black or dark blue
- A glass bowl, jar, or drinking glass
- A few drops of water
- Hairspray or artist’s fixative for preserving the finished print
- Adult supervision
Using both white and dark paper is especially useful because spores can vary in color.
Some spores show up beautifully on white paper, while pale spores may be much easier to see on dark paper.
Step 1: Prepare Your Specimen
If You Are Using a Mushroom
Gently remove the stem so that the cap can sit flat on the paper.
Try not to touch the gills underneath the mushroom cap.
If You Are Using a Fern
Choose a mature frond with plenty of visible brown or orange sori on the underside.
Cut a section of the frond that can lie flat on your paper.
.
.
.
.
.
Step 2: Place It on the Paper
Place the mushroom gill-side down on the paper.
For a fern, place the frond sori-side down.
For an extra interesting experiment, place the specimen so that part of it sits over white paper and part sits over dark paper.
Then you can compare how well the spores show up against each background.
Step 3: Add a Little Moisture
If you are using a mushroom, you can place one or two tiny drops of water on the top of the mushroom cap.
This can help prevent the mushroom from drying out too quickly.
Do not soak it—the goal is only a little moisture.
For a fern frond, extra water is usually unnecessary.
Step 4: Cover It
Carefully cover the mushroom or fern with a glass bowl, jar, or drinking glass.
Why?
Because spores are incredibly light.
Even small air currents in a classroom or kitchen can disturb them.
The cover creates a still environment so the spores can fall directly onto the paper.
Step 5: Wait
Now comes the difficult part.
Waiting.
Leave your experiment undisturbed for approximately 6–12 hours, or overnight.
During that time, thousands of tiny spores may fall onto the paper.
Step 6: Reveal the Spore Print
The next day, carefully lift away the glass.
Then slowly lift the mushroom or fern straight upward.
Try not to slide it across the paper.
Now look closely.
You may see a delicate layer of powder forming an intricate pattern.
A mushroom can leave behind a print that mirrors the structure of its gills.
A fern may create softer patches of spore dust beneath the sori.
You are looking at something remarkable:
a visible pattern made from thousands or millions of microscopic reproductive cells.
Turn Your Spore Print Into Art
The science experiment does not have to end there.
Once children understand where the pattern came from, they can begin experimenting with spore print art.
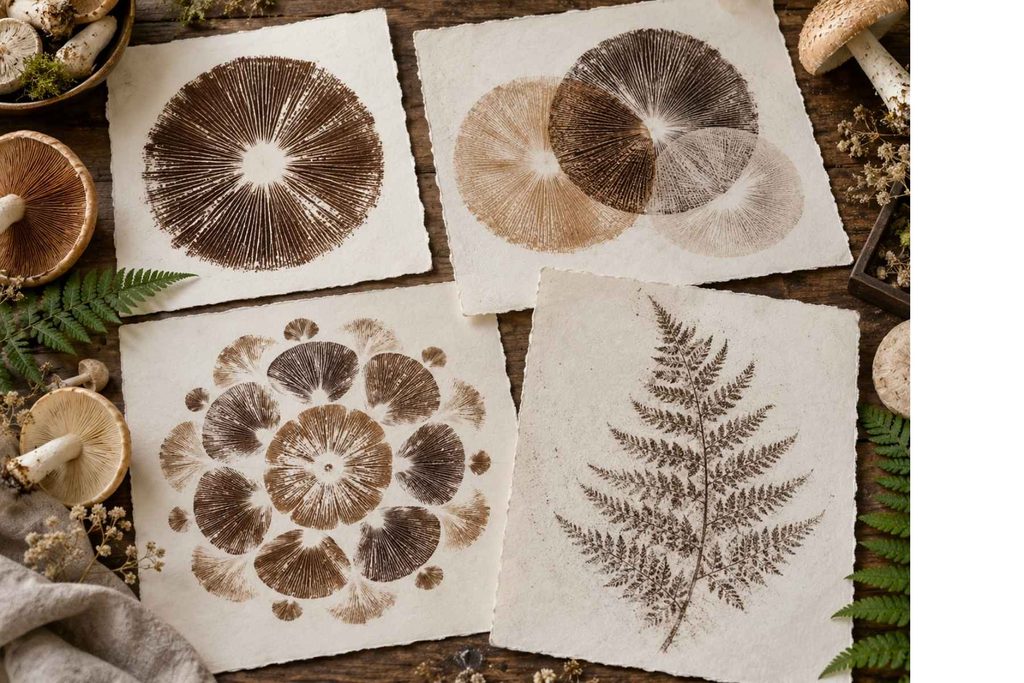
Create Spore Mandalas
Try arranging several mushroom caps in a circle.
Allow their prints to overlap slightly.
When the mushrooms are removed, the repeating patterns can create a natural mandala-like design.
Make Nature Cards
Create small spore prints on pieces of cardstock.
Once the prints are fixed in place, they can become:
- nature-inspired greeting cards
- science journal covers
- bookmarks
- classroom display pieces
Experiment With Different Species
Different mushrooms can produce spores in different shades.
Depending on the species, a spore print might appear:
- white
- cream
- pinkish
- brown
- rust-colored
- dark brown
- nearly black
This creates another science question:
Do all mushrooms produce the same color spores?
Children can make predictions before revealing each print.
Compare Light and Dark Paper
Place the same mushroom across two different paper colors.
Ask students:
Which background makes the spores easier to see?
This turns the activity into a simple investigation of contrast and observation.
Discover more hands-on STEM activities for Grades K–4 →https://lolliartscience.com/stem-activities-for-kids/
How to Preserve a Spore Print
Fresh spore prints are extremely delicate.
The spores sit loosely on the paper like fine powder, so touching or blowing on the print can destroy the pattern.
If you want to preserve the artwork, an adult can carefully apply a light layer of hairspray or artist’s fixative.
Place the picture on a flat surface in a well-ventilated area.
Hold the spray approximately 12 inches (30 cm) away and apply a very light mist.
Do not spray too heavily or too close to the paper, because the force of the spray can disturb the spores.
Allow the print to dry completely before touching it.
A Perfect STEAM Activity
Spore print art sits beautifully between science and art.
Children begin with a biology question:
How do organisms reproduce without seeds?
They investigate tiny structures they may never have noticed before.
They observe a biological process they normally cannot see.
And finally, they transform the results into artwork.
That makes this activity a wonderful example of STEAM learning—Science, Technology, Engineering, Art, and Math working together.
More importantly, it encourages children to look more closely at ordinary things.
A fern leaf is no longer just a fern leaf.
A mushroom is no longer just something growing on the forest floor.
Underneath them is an entire microscopic reproductive system quietly at work.
Sometimes the most fascinating parts of nature are the ones we almost cannot see.
And sometimes all it takes is a piece of paper to reveal them.
🌿 Extend the Learning
Made a spore print? Now discover what happens next.
Fern Life Cycle Worksheets for K–2
Spore → Tiny Gametophyte → Young Fern → Mature Fern → Spores
FAQ
A spore print is a pattern created when tiny spores fall from a mushroom, fern, or other spore-producing organism onto a surface. With mushrooms, the print often shows the shape and arrangement of the gills underneath the cap.
Remove the mushroom stem, place the cap gill-side down on paper, cover it with a glass or bowl, and leave it undisturbed for about 6–12 hours. When you lift the mushroom, a spore pattern may be visible on the paper.
Yes. Spore printing can be a simple hands-on science and art activity for children when adults supervise mushroom handling and any spray used to preserve the finished print. Store-bought mushrooms are a practical choice for classroom or home activities.
The brown or orange dots on many fern fronds are called sori. Each sorus contains structures called sporangia, which produce and release spores.