With Hands-on cherry tree life cycle activities
3-LS1-1 – From Molecules to Organisms: Structures and Processes
Develop models to describe that organisms have unique and diverse life cycles but all have in common birth, growth, reproduction, and death.
Spring is the perfect time to explore the cherry tree life cycle with young learners. As cherry trees begin to bloom, students can connect what they see outdoors with an important elementary life science concept: how a plant grows, changes, flowers, produces fruit, and begins the cycle again.
To make this topic easy and engaging for young learners, I created a free printable Cherry Tree Life Cycle worksheet pack for Grades 2–3.
The activities use clear pictures, simple science vocabulary, coloring, sequencing, drawing, and hands-on tasks to help students understand each stage of the cherry tree’s development.

Why Teach the Cherry Tree Life Cycle?
Life cycles are much easier for children to understand when they can connect them to something familiar.
A cherry tree is a great example because its changes are easy to observe throughout the year. Students can follow the tree from a tiny seed to a flowering tree that eventually produces fruit.
The five main stages used in this resource are:
Seed → Sprout → Young Tree → Flowering Tree → Cherry Fruit
Students learn how:
- a new cherry tree can grow from a seed,
- a small sprout emerges,
- the sprout develops into a young tree,
- the tree produces pink or white flowers as a flowering tree, and
- after pollination, cherries begin to develop.
Inside each cherry is a hard pit, and inside the pit is a seed that can begin the cycle again.
This makes the cherry tree a simple and visual way to introduce the idea that a life cycle is a repeating pattern of growth and change.
What Is Included in the Cherry Tree Life Cycle Worksheets?
The printable activities are designed to support visual learning, science vocabulary, sequencing skills, fine motor development, and independent thinking.
1. Cherry Tree Life Cycle Diagrams
Students first explore the complete life cycle using a clear visual diagram.
The stages are shown in order:
Seed → Sprout → Young Tree → Flowering Tree → Cherry Fruit
A full-color version is useful for introducing the concept during a science lesson, while the black-and-white version can be colored by students.
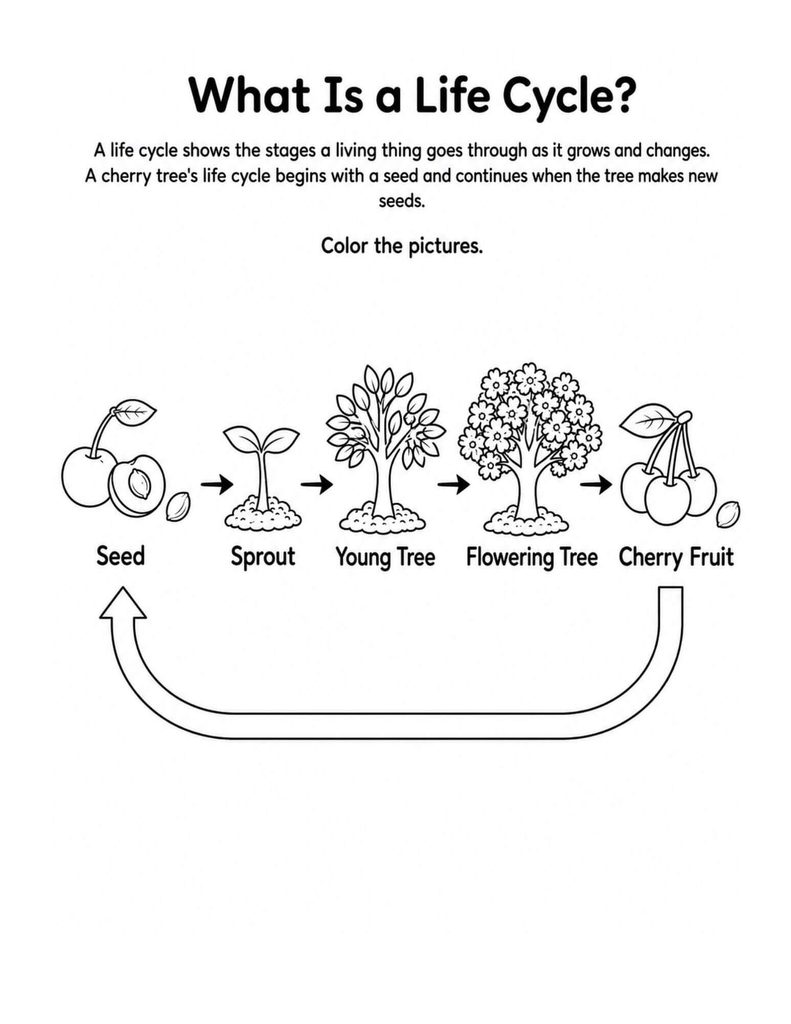
2. What Is a Life Cycle?
Before working independently, students learn the meaning of a life cycle:
A life cycle shows the stages a living thing goes through as it grows and changes.
The simple visual sequence helps children see that the process does not simply stop when the tree produces cherries. The fruit contains a seed, allowing a new cycle to begin.
3. Match the Life Cycle Stages
Students match pictures of the different stages with simple science descriptions.
For example:
“A small sprout grows from the seed.”
and
“After pollination, cherries begin to grow.”
This activity combines visual recognition with basic science vocabulary and reading practice.
4. Cherry Tree Life Cycle Vocabulary
Students use the words:
- Seed
- Sprout
- Young Tree
- Flowering Tree
- Cherry Fruit
They identify each stage and write the correct word underneath the matching picture.
This is a simple way to reinforce vocabulary while checking whether students can recognize the stages independently.
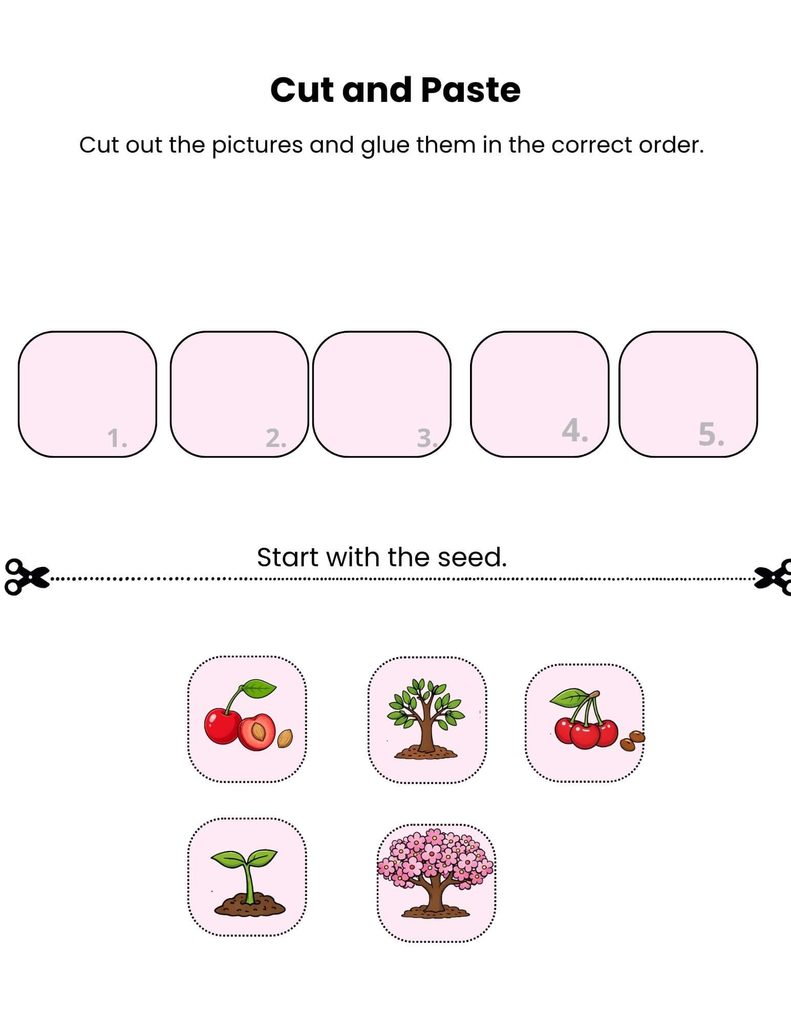
5. Cut and Paste the Cherry Tree Life Cycle
Who doesn’t love a good cut-and-paste activity in elementary science?
Students cut out the five life cycle pictures and glue them into the correct order, beginning with the seed.
This hands-on activity is especially useful for students who benefit from physically manipulating the stages before completing more abstract sequencing tasks.
It also provides extra practice with fine motor skills, sequencing, and logical thinking.

6. Draw the Cherry Tree Life Cycle
Once students understand the sequence, they can create their own visual model.
Instead of simply choosing from pictures, students draw:
Seed → Sprout → Young Tree → Flowering Tree → Cherry Fruit
Drawing each stage encourages students to think carefully about how the plant changes from one stage to the next.
You can also ask students to explain their drawings using a complete sentence:
“The sprout grows into a young tree.”
7. Color the Flowering Cherry Tree
A detailed flowering cherry tree coloring page gives students a quieter science activity while reinforcing one of the most recognizable stages of the life cycle.
Look closely at the blossoms and the bee in the picture.
This is also a great opportunity to introduce a new question:
Why are bees important to a cherry tree?
That question leads naturally into a simple discussion of pollination.

8. Cherry Tree Fun Facts
Students also discover a few simple facts about cherry trees:
- Cherry blossoms can be pink or white.
- Bees help move pollen from flower to flower.
- After a flower is pollinated, a cherry can begin to grow.
- Each cherry has a hard pit that protects a seed.
These facts help students move beyond memorizing the stages and begin thinking about what actually happens during flowering and fruit production.
9. Mini Cherry Tree Life Cycle Quiz
At the end of the lesson, students can complete a short three-question quiz.
Questions include:
Which stage begins this life cycle?
What grows after the sprout?
What can begin to grow after a flower is pollinated?
The quiz works well as a quick formative assessment, science center check, or exit activity.
10. Parts of a Cherry
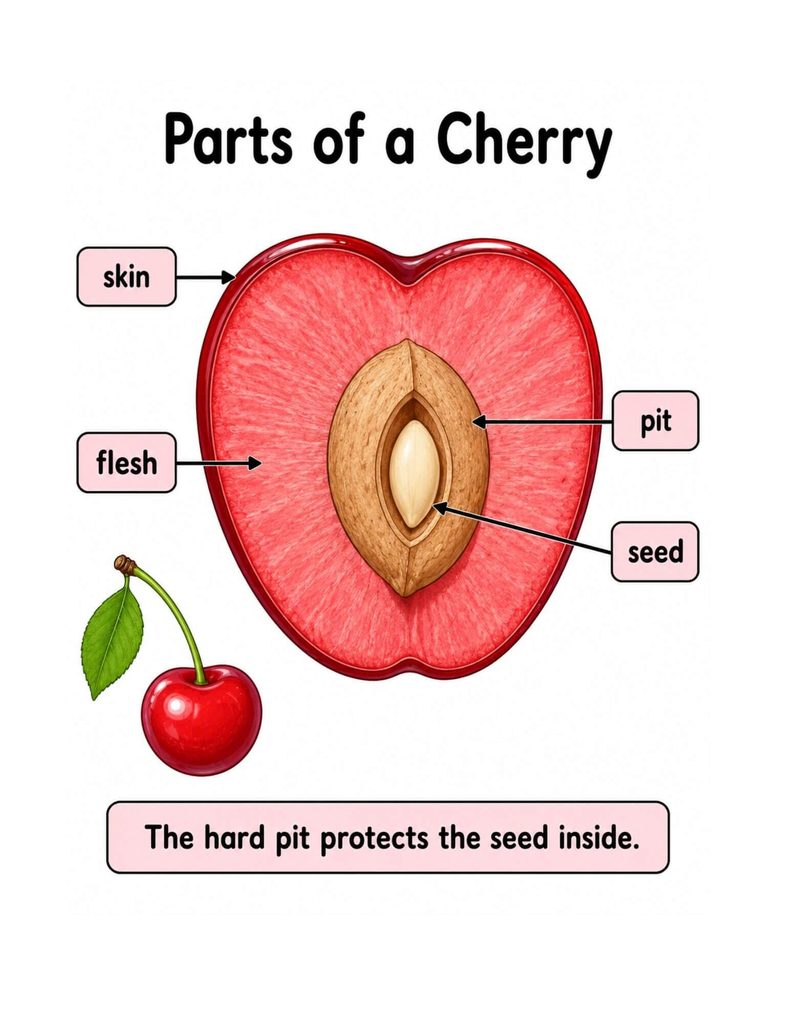
The resource also takes a closer look inside the fruit itself.
Students learn four important parts:
- skin
- flesh
- pit
- seed
The diagram clearly shows that the pit is the hard structure surrounding and protecting the seed.
For an easy hands-on extension, cut a real cherry in half and ask students to identify the same parts they see on the worksheet.
Answer Key Included
A complete Answer Key is included for the matching, vocabulary, sequencing, drawing sequence, and mini quiz activities, making the resource easy to use for teachers, homeschool families, and independent learning.
Easy Ways to Use These Worksheets
These cherry tree life cycle activities can be used in several ways:
- during a spring science unit,
- as part of a plant life cycle lesson,
- in a science center,
- for morning work,
- as an early finisher activity,
- during a seasonal nature study,
- in a homeschool science lesson, or
- as a follow-up after observing flowering trees outdoors.
You do not need to complete every page at once.
For Grades 2–3, you could easily turn the resource into a short mini-unit by introducing the life cycle first, completing the sequencing activities next, and finishing with pollination, the parts of a cherry, and the mini quiz.
Cherry tree life cycle activities

1. Craft and Fine Motor Activities
Four-Season Cherry Tree Craft
A Four-Season Cherry Tree Craft is a simple hands-on way to help students connect the cherry tree life cycle with seasonal changes. It also gives young learners plenty of opportunities to practice cutting, gluing, painting, pinching, and other fine motor skills.
Start by drawing or printing the same bare cherry tree on four separate sheets of paper. Students then transform each tree to show what it might look like during a different season.
- Spring – Flowering Tree: Create pink and white cherry blossoms using small pieces of crumpled tissue paper. Students can also dip cotton swabs into pink and white paint to make blossom prints.
- Summer – Cherry Fruit: Add ripe red cherries with fingerprints, red paint dots, pom-poms, or small red buttons.
- Fall: Decorate the tree with yellow, orange, and brown leaves to show how the tree changes as the growing season ends.
- Winter: Leave most of the branches bare and add cotton balls or small pieces of white tissue paper to represent snow.
As students work, encourage them to compare the four trees.
Ask questions such as:
What changes do you notice from spring to summer?
When do the flowers appear?
When does the tree produce cherries?
What happens to the leaves in fall and winter?
This activity makes a useful extension to a cherry tree life cycle lesson for Grades 2–3 because students can connect the stages they have learned—especially the Flowering Tree and Cherry Fruit stages—to changes they may observe outdoors throughout the year.
2. Playdough Activity: From Seed to Fruit
This hands-on playdough activity helps students model the five main stages of the cherry tree life cycle while practicing fine motor skills.
Ask students to create each stage with playdough:
- a small brown Seed
- a green Sprout
- a Young Tree
- a Flowering Tree covered with pink or white blossoms
- a Cherry Fruit, including one cut in half so students can see the pit and the seed inside
When students finish, have them place their models in the correct order:
Seed → Sprout → Young Tree → Flowering Tree → Cherry Fruit
For an extra science connection, ask students to explain how each stage changes into the next one.


3. Movement and Role-Play Activities
Let’s Grow Together! – Cherry Tree Life Cycle Role Play
This simple movement activity helps students act out the cherry tree life cycle with their whole bodies. It works well as a quick brain break, science warm-up, or review activity for Grades 2–3.
Guide students through each stage:
- Seed: Students curl up close to the floor like tiny seeds resting in the soil.
- Sprout: They slowly rise and stretch upward like a new sprout pushing through the ground.
- Young Tree: Students stand tall and stretch their arms out like growing branches.
- Flowering Tree: They spread their fingers wide to represent blossoms opening on the tree.
- Cherry Fruit: Finally, students pretend to be buzzing bees moving from flower to flower for pollination. Then they return to their “tree” pose and pretend that cherries are beginning to grow.
Afterward, ask students to repeat the stages in order:
Seed → Sprout → Young Tree → Flowering Tree → Cherry Fruit
This activity is especially useful for kinesthetic learners because it connects science vocabulary with movement, sequencing, and imaginative play.
4. Sensory and Outdoor Exploration
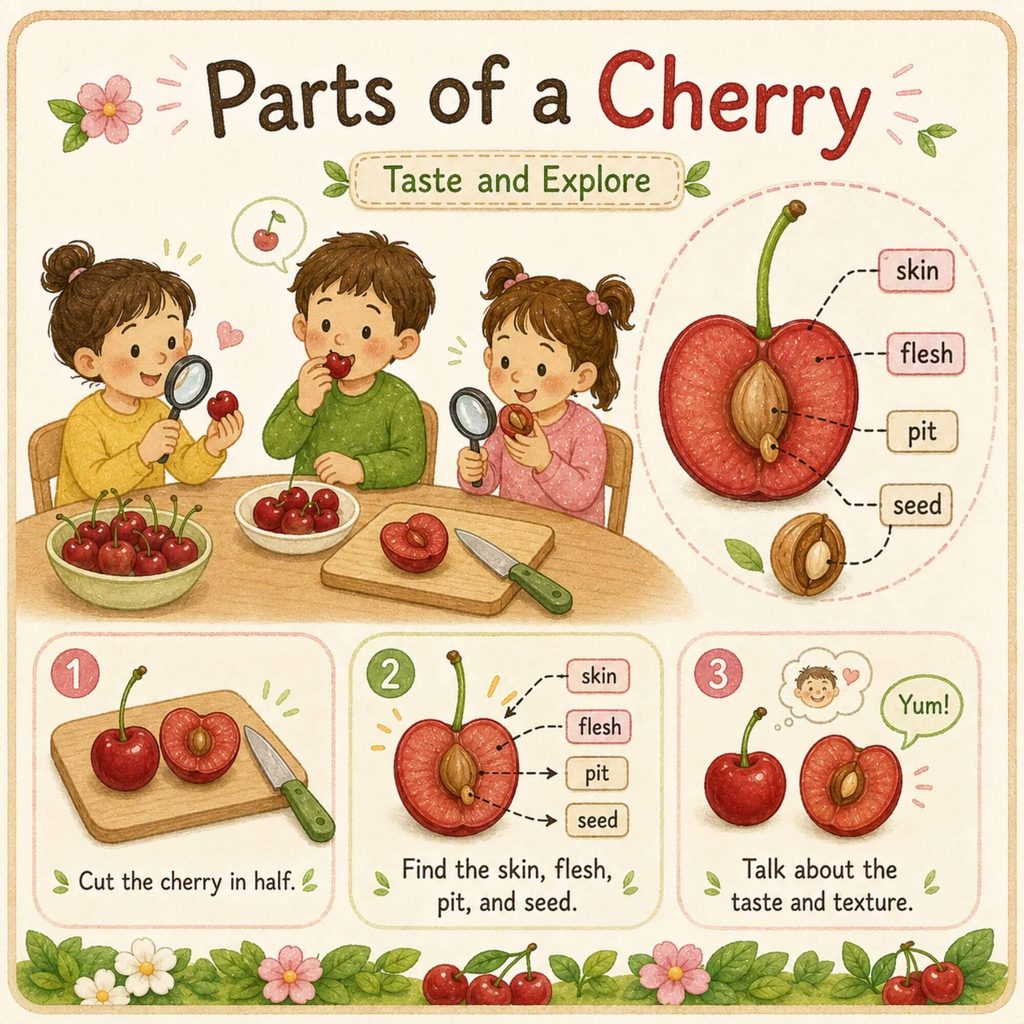
Taste and Explore: Parts of a Cherry
Turn the Parts of a Cherry worksheet into a simple hands-on science investigation by examining a real cherry.
Cut a cherry in half and invite students to look closely at its different parts. Using the worksheet as a guide, ask them to identify:
- Skin – the thin outer covering
- Flesh – the soft, juicy part of the fruit
- Pit – the hard structure in the center
- Seed – the seed found inside the pit
Students can then taste the cherry and describe what they notice.
Ask questions such as:
Is the cherry sweet, tart, or both?
How does the flesh feel?
Is the skin smooth or rough?
How is the pit different from the flesh?
This simple sensory activity helps students connect the vocabulary on the worksheet with a real fruit while practicing observation, description, and comparison skills.
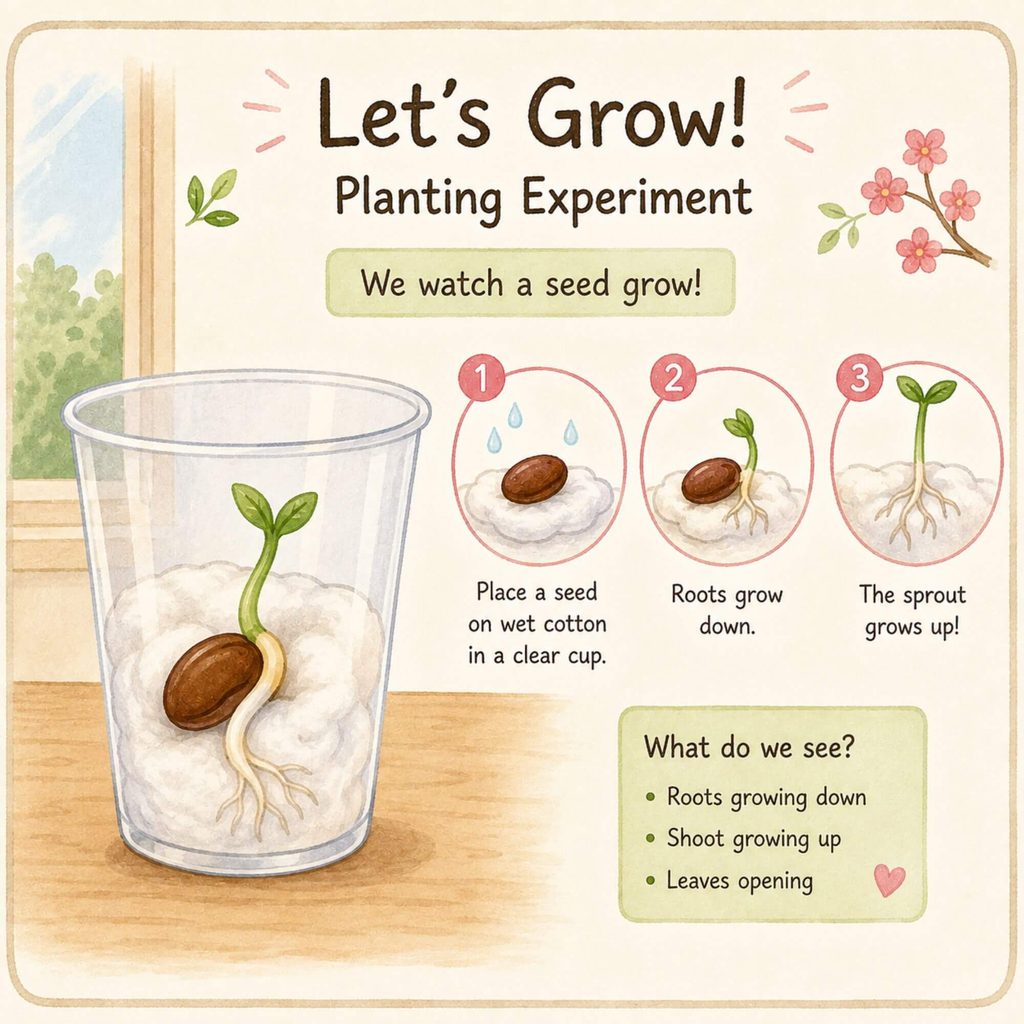
5. Planting Experiment: Watch a Sprout Grow
Place a seed or bean on damp cotton inside a clear cup so students can observe germination up close.
Over the next few days, encourage them to watch for the first changes: the root growing downward and the sprout emerging and growing upward.
Students can draw or record what they notice each day.
This simple experiment gives children a real-life way to observe the Sprout stage and see how a new plant begins to grow.
6. Cross-Curricular Connections
Cherry Math for Grades 1–2
The cherry theme can easily extend into a simple math activity for younger learners.
Start with counting cherry pairs. Show students groups of two cherries and practice skip-counting by twos:
2, 4, 6, 8, 10…
Students can use real cherries, counters, paper cutouts, or illustrated cherry cards to build each number as they count.
You can also practice making equal groups. Give students a collection of cherry pictures or manipulatives and ask them to arrange them into:
- groups of 2
- groups of 3
- groups of 4
Then ask:
How many groups did you make?
How many cherries are in each group?
Are there any cherries left over?
This activity connects the cherry tree theme with counting, skip-counting, equal groups, and early multiplication concepts in a simple, hands-on way.

Teacher note: Avoid grouping cherries by the number of seeds inside each fruit. A cherry typically has one pit containing one seed, so grouping the fruit itself is a more scientifically accurate math connection.

7. Writing Connection for Grades 2–3
A Cherry Seed’s Diary
Add a simple creative writing activity to your cherry tree life cycle lesson by asking students to imagine that they are a tiny cherry seed.
Students write a short first-person story describing how they grow and change through the different stages of the life cycle.
You can begin with a sentence starter such as:
“I was a tiny seed resting in the dark soil. Then spring arrived…”
Encourage students to continue the story using important science vocabulary, such as:
- seed
- sprout
- young tree
- flowering tree
- cherry fruit
- pollination
Students might describe how they push through the soil as a sprout, grow into a young tree, produce blossoms, receive visits from pollinators, and eventually develop cherries.
This activity combines science, sequencing, vocabulary, and narrative writing, while giving students a creative way to show what they understand about the cherry tree life cycle.
Frequently Asked Questions About the Cherry Tree Life Cycle
For young learners, the cherry tree life cycle can be simplified into five main stages:
Seed → Sprout → Young Tree → Flowering Tree → Cherry Fruit
A seed begins to grow, develops into a sprout, grows into a young tree, produces flowers, and eventually produces cherries. Inside each cherry is a pit containing a seed, allowing the cycle to begin again.
Start with a simple idea: a cherry tree grows and changes in stages.
Use pictures or real-life examples to show students how a seed sprouts, grows into a tree, produces blossoms, and eventually develops fruit.
Hands-on activities such as sequencing cards, drawing, movement, playdough models, and observing a real cherry can make the process easier for Grades 2–3 students to understand.
After the flowers are successfully pollinated, cherries can begin to develop.
Pollinators such as bees help move pollen from flower to flower. Once pollination occurs, the flower can begin developing into fruit.
Bees are important pollinators.
As bees visit cherry blossoms, they can carry pollen from one flower to another. This process helps the flowers become pollinated so that cherries can begin to grow.
No. The pit and the seed are different parts.
The pit is the hard structure found in the center of the cherry. Inside the pit is the seed.
For young students, cutting open or closely examining a cherry is a helpful way to demonstrate the difference between the skin, flesh, pit, and seed.
Students can learn four simple parts of a cherry:
Skin – the thin outer covering
Flesh – the soft, juicy part of the fruit
Pit – the hard structure in the center
Seed – the seed protected inside the pit
A real cherry can turn this vocabulary lesson into a simple sensory science investigation.
A simplified cherry tree life cycle lesson works especially well for Grades 2–3.
Students at this level can practice sequencing the stages, reading short science descriptions, learning vocabulary, creating models, and explaining how the tree changes over time.
Many of the hands-on activities can also be adapted for Grade 1 or extended for older elementary students.
There are many ways to make the topic interactive. Students can:
act out the life cycle with body movements,
build each stage with playdough,
create a four-season cherry tree craft,
sequence cut-and-paste pictures,
draw the complete life cycle,
examine the parts of a real cherry,
practice cherry-themed counting and grouping, or
write a first-person Cherry Seed Diary.
Using several types of activities helps students encounter the same science concept through movement, art, writing, observation, and discussion.
Give students pictures of the five life cycle stages and ask them to arrange them from beginning to end:
Seed → Sprout → Young Tree → Flowering Tree → Cherry Fruit
Students can cut and paste the pictures, use flashcards, draw arrows between stages, or explain what happens before and after each stage.
Sequencing activities are especially useful for checking whether students understand how the stages are connected.
A quick assessment does not need to be complicated.
Ask students to:
put the life cycle stages in order,
identify each stage from a picture,
explain what happens after pollination,
name the stage that follows the sprout, or
draw the complete life cycle.
A short mini quiz or exit ticket can also provide a quick check for understanding
Yes. Once students have been introduced to the main vocabulary, many of the activities can be completed independently.
Matching, labeling, sequencing, drawing, coloring, and the mini quiz are especially suitable for science centers, morning work, early finishers, homeschool lessons, or independent review.
The topic works well for cross-curricular learning.
In math, students can count cherry pairs, skip-count by twos, or create equal groups.
In writing, students can write a first-person story such as “A Cherry Seed’s Diary.”
In art, they can create flowering trees or model the stages with playdough.
These activities allow students to revisit the same science vocabulary in several different contexts.
Professional References and Teacher Resources
For teachers who would like to explore plant life cycles, pollination, and cherry trees in more depth, these trusted U.S. science and education resources provide helpful background information and classroom connections.
- Next Generation Science Standards – Grade 3 Life Cycles (3-LS1-1)
This standard asks students to develop models showing that organisms have different life cycles while sharing patterns of growth and reproduction. It is the strongest direct NGSS connection for your Grade 3 cherry tree life cycle activities.
NGSS – 3-LS1 Life Cycles - Next Generation Science Standards – Pollination (2-LS2-2)
Grade 2 students are expected to develop simple models related to animals dispersing seeds or pollinating plants, making this especially relevant to your bee and cherry blossom activities.
NGSS – Grade 2 Interdependent Relationships in Ecosystems - U.S. National Park Service – Pollination Exploration
This is particularly useful for your article because it is an actual elementary teacher lesson designed around pollination. It includes age-appropriate explanations, vocabulary, hands-on modeling, and a pollinator movement activity for second graders.
National Park Service – Pollination Exploration for Teachers - USDA Natural Resources Conservation Service – Insects and Pollinators
A strong scientific reference for explaining why bees and other animals matter to flowering plants. The USDA explains how pollinators transfer pollen and how pollination enables plants to produce seeds and fruit.
USDA NRCS – Insects and Pollinators - Penn State Extension – Orchard Pollination
This is especially useful because it discusses fruit trees and cherries specifically. Penn State explains the relationship between blossoms, pollination, bees, and fruit production and notes differences between sweet and tart cherries.
Penn State Extension – Orchard Pollination - Penn State Extension – Cherries in the Garden and the Kitchen
A useful cherry-specific background reference covering sweet and tart cherries, cherry trees, and their pollination requirements.
Penn State Extension – Cherries in the Garden and the Kitchen - Oregon State University Extension – Sweet Cherry Pollination
For teachers or parents wanting deeper background, this university resource focuses specifically on sweet cherry pollination and the important role of bees in cherry orchards.
Oregon State University Extension – Sweet Cherry Pollination
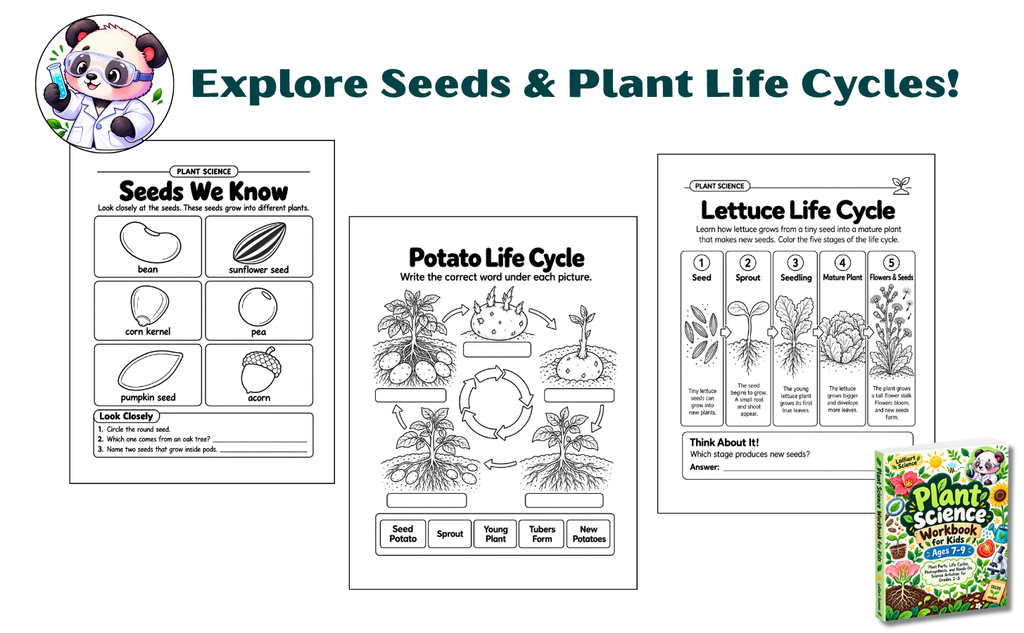
Discover the fascinating ways plants grow and reproduce! This 120-page Plant Science Workbook helps children ages 7–9 explore familiar seeds, learn how potatoes grow from tubers, and follow the lettuce life cycle from seed to mature plant. Engaging illustrations, sequencing exercises, and interactive worksheets make plant science fun and easy to understand.