with free observation log
Soil may look like one material, but it is actually a mixture of many different components. In this simple soil jar experiment, students mix soil with water and observe how the materials separate into visible layers. Free Soil Jar Observation Log included.

The investigation gives young scientists an opportunity to make predictions, carry out a hands-on test, record observations, identify patterns, and use evidence to explain their results.
Lesson at a Glance
Recommended grade level: Grades 2–3
Group size: Partners or small groups
Time required: Two sessions
Session 1: Approximately 30–40 minutes
Session 2: Approximately 25–35 minutes after the jars have settled overnight
Essential Question
What is soil made of, and what happens when soil is mixed with water and allowed to settle?
Learning Objectives
Students will:
- observe and describe a soil sample;
- predict what will happen when soil is mixed with water;
- conduct a simple investigation;
- identify sand, silt, clay, and organic matter;
- record the layers that form inside a soil jar;
- recognize patterns in the way different soil particles settle;
- use observations as evidence to explain why some materials sink while others float.
NGSS Alignment
This lesson most directly supports NGSS 2-PS1-1: Matter and Its Interactions, which asks students to plan and conduct an investigation that describes and classifies materials according to their observable properties. See the official NGSS 2-PS1-1 standard.
Three-Dimensional Learning
Science and Engineering Practice: Planning and Carrying Out Investigations
Students help plan and conduct a collaborative investigation. They make a prediction, follow an agreed-upon procedure, observe the results, and record evidence.
Disciplinary Core Idea: PS1.A – Structure and Properties of Matter
Students discover that soil contains different types of matter. These materials can be described and classified using observable properties such as particle size, texture, and position in the jar.
Crosscutting Concept: Patterns
Students identify a pattern in the settled soil. Larger mineral grains usually settle near the bottom, smaller particles form layers above them, and some lightweight organic materials may float.
Important Alignment Note
The activity is most strongly aligned when students do more than label a prepared diagram. Allow them to make predictions, discuss what should remain the same for each group, observe their own jar, compare results, and explain their conclusions using evidence.
For Grade 3, this investigation works well as a review of material properties and as an introduction to Earth materials and scientific observation.

Vocabulary
- soil: a mixture of mineral particles, organic matter, water, air, and living things
- particle: a small piece of a material
- sand: the largest of the three main mineral particle groups in soil
- silt: mineral particles that are smaller than sand but larger than clay
- clay: very small mineral particles that settle slowly
- organic matter: material that comes from living or once-living things
- settle: to move downward and collect at the bottom
- layer: a section of material resting above or below another section
Want to take your soil lesson a step further? Explore the tiny creatures living beneath our feet with these Soil Animals Coloring Activities for Grades 2–3 and connect soil science with habitats, decomposers, and food chains. https://lolliartscience.com/2026/08/16/soil-animals-coloring-pages-grades-2-3/
Materials
For each group, provide:
- one clear plastic jar with a tightly fitting lid;
- approximately 1–2 cups of garden or schoolyard soil;
- water;
- a small scoop or spoon;
- a magnifying glass;
- a tray or plastic table covering;
- a permanent marker or label;
- pencils and crayons or colored pencils;
- one copy of the Soil Jar Observation Log for each student.
Clear plastic containers are safer than glass jars in an elementary classroom.
Teacher Preparation
Collect soil from a safe, untreated area. Avoid locations that may contain animal waste, pesticides, fertilizers, broken glass, or other contaminants.
Choose mineral-rich garden or schoolyard soil instead of commercial potting mix. Potting mix often contains a large amount of organic material and may not produce clearly defined sand, silt, and clay layers.
Break apart large clumps before the lesson, but leave a few small pieces of leaves, roots, or twigs so students can observe organic matter.
Prepare one soil jar at least 24 hours before the lesson. This provides a backup example if the student jars have not settled clearly by the second session.
Safety
Remind students:
- Do not taste or smell the soil closely.
- Keep hands away from the face during the investigation.
- Make sure the lid is completely closed before shaking the jar.
- Shake the jar only over a tray and away from other students.
- Wash hands thoroughly after handling soil.
The teacher should supervise all soil collection and jar shaking.
Session 1: Engage and Explore
1. Introduce the Phenomenon
Show students a dry soil sample.
Ask:
- What do you notice about this soil?
- Does all of it look and feel the same?
- What materials might be hiding inside it?
- Do you think soil is one material or a mixture of materials?
Allow students to examine the soil with magnifying glasses. Encourage them to describe its color, texture, particle sizes, and any pieces of organic matter they notice.
2. Ask the Investigation Question
Write the investigation question where everyone can see it:
What will happen when we mix soil and water and then leave the mixture undisturbed?
Students may share or write predictions such as:
- All the soil will stay mixed with the water.
- The soil will sink to the bottom.
- Some materials will sink, but other materials will float.
- The soil will separate into different layers.
At this stage, accept all reasonable predictions. Students will evaluate their ideas after observing the results.
3. Plan a Consistent Investigation
Ask students what each group should keep the same so that the results can be compared.
Possible responses include:
- the size of the jar;
- the amount of soil;
- the amount of water;
- the length of shaking time;
- the length of settling time.
If groups use soil from different locations, label each jar with the collection location.
4. Set Up the Soil Jars
Have students complete the following steps:
- Fill the clear jar approximately halfway with soil.
- Add water until it is close to the top, leaving a small air space so the contents can move.
- Close the lid tightly.
- Shake the jar vigorously for approximately 60 seconds.
- Place the jar on a stable surface.
- Label it with the group members’ names and the soil collection location.
- Leave the jar undisturbed overnight.
Invite students to observe the jar immediately after shaking. The water will probably appear very cloudy because small soil particles are suspended throughout it.
If time permits, observe the jars again after 5–10 minutes. Students may already notice that larger grains are beginning to collect at the bottom.
Session 2: Explain, Elaborate, and Evaluate
5. Observe the Settled Jars
Without moving or shaking the jars, ask students to look carefully at the results.
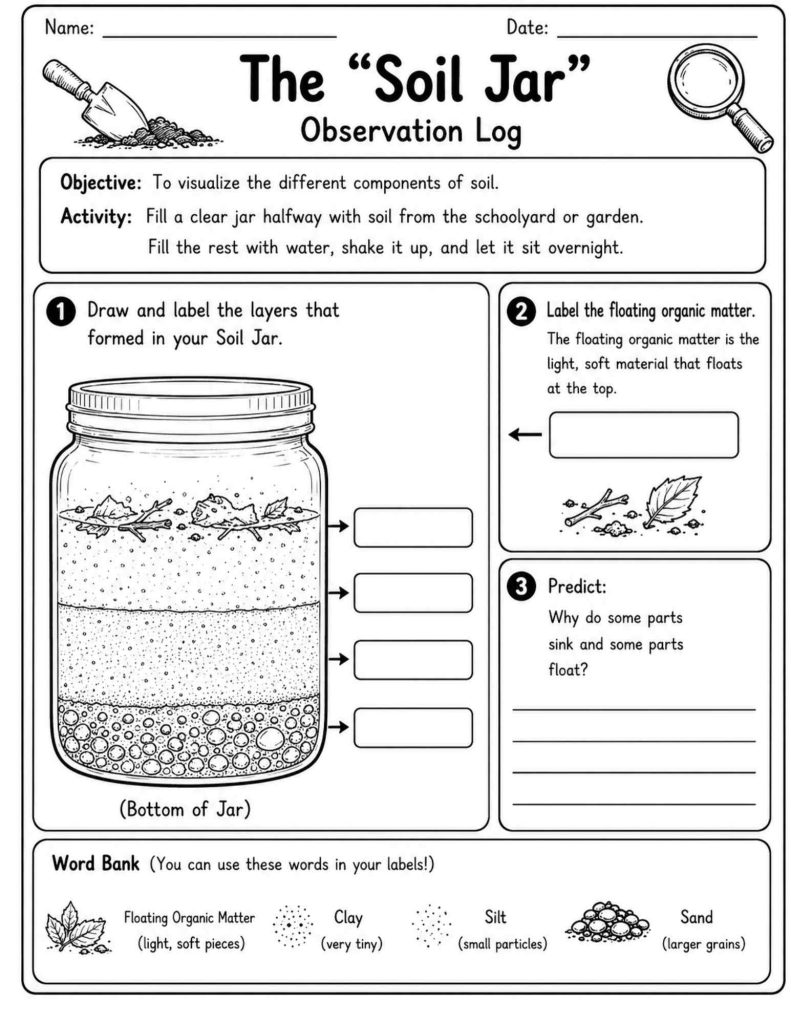
Have them complete the Soil Jar Observation Log by:
- drawing the layers they can see;
- labeling sand, silt, clay, and floating organic matter;
- noting colors, textures, and differences in layer thickness;
- answering why some materials sank while other materials floated.
Remind students to record what they actually observe. A jar with uneven or unclear layers is still a valid scientific result.
6. Identify the Layers
A typical soil jar may show the following arrangement:
| Position in the jar | Likely material | What students may observe |
|---|---|---|
| Water surface | Floating organic matter | Small leaves, roots, bark, or other lightweight pieces |
| Top of the settled sediment | Clay | Very fine particles forming a thin, smooth layer |
| Middle sediment layer | Silt | Small particles with a smoother appearance than sand |
| Bottom of the jar | Sand | Larger, more visible grains that settled first |
There may also be a section of clear or cloudy water above the clay layer.
7. Discuss the Science
Explain that soil is a mixture rather than a single material. Shaking spreads the soil particles throughout the water. When the jar is left undisturbed, gravity pulls the particles downward.
The particles do not all settle at the same rate:
- Sand grains are relatively large and settle quickly.
- Silt particles are smaller and settle more slowly.
- Clay particles are extremely small and may remain suspended for a long time before forming the upper mineral layer.
- Some lightweight organic matter may float because it is less dense than the mineral particles or contains trapped air.
Some organic material may sink or remain mixed with the soil. Real soil samples do not always form four perfectly distinct layers.
8. Compare Results
Invite groups to compare their jars.
Ask:
- Which layer is the thickest?
- Which layer is the thinnest?
- Did all jars form the same pattern?
- Which soil sample contained the most sand?
- Which jar had the most floating organic matter?
- What evidence shows that soil is a mixture?
- Did the results support your original prediction?
Help students distinguish between an observation and an explanation.
Observation: The largest grains are at the bottom of the jar.
Explanation: The larger grains settled faster than the smaller particles.
9. Construct an Evidence-Based Explanation
Use this sentence frame for younger students:
I learned that soil is made of __________. My evidence is __________.
For more independent writers:
Soil is a mixture of different materials. I know this because __________.
A complete response might be:
Soil is a mixture of different materials. I know this because the soil separated into sand, silt, clay, and organic matter inside the jar.
Assessment
Use the following evidence to assess student understanding:
- participation in the prediction and planning discussion;
- safe and accurate completion of the investigation;
- a drawing that represents the student’s actual jar;
- appropriate use of the vocabulary words;
- correct identification of the main layers;
- an explanation supported by observations.
Exit Ticket
Ask students to answer:
What evidence from the soil jar shows that soil contains different materials?
Differentiation
Support for Younger Students and Multilingual Learners
- Review the picture-supported word bank before the experiment.
- Provide labeled picture cards for sand, silt, clay, and organic matter.
- Let students discuss their observations with a partner before writing.
- Use sentence frames.
- Allow students to point to or orally name the layers.
Challenge for Advanced Learners
- Measure the thickness of each sediment layer.
- Compare soil collected from two different locations.
- Create a bar graph showing the thickness of the sand, silt, and clay layers.
- Observe and record the jar at several time intervals.
- Research how different soil types affect plant growth or water drainage.
Optional Extension: Soil and Erosion
Place equal amounts of different soil samples in shallow trays. Slowly pour the same amount of water over each sample and compare how much soil moves.
Students can then investigate ways to reduce erosion, such as adding mulch, rocks, grass, or plant roots. This extension can help build toward 2-ESS2-1, in which students compare solutions that slow or prevent wind or water from changing the land.
Teacher Answer Guide
Expected labels from top to bottom:
- Floating Organic Matter
- Clay
- Silt
- Sand
Suggested Response to the Prediction Question
The larger and heavier mineral particles sink. Sand settles first, followed by silt and clay. Some lightweight organic matter floats because it is less dense or contains trapped air.
Accept developmentally appropriate responses such as:
The heavy parts sink, and the light parts float.
Teacher Tips and Troubleshooting
The water is still cloudy:
Clay particles can take longer than 24 hours to settle. Leave the jar undisturbed for another day.
The layers are difficult to see:
Try a different outdoor soil sample. Commercial potting mix may contain too much organic matter to form clear mineral layers.
Only one or two layers formed:
This may indicate that the soil sample contains a large proportion of one particle type. Compare it with another sample instead of treating the result as incorrect.
The groups have different results:
Use the differences as evidence that soils from different locations do not contain identical proportions of sand, silt, clay, and organic matter.
Conclusion
The soil jar experiment turns an ordinary scoop of soil into an observable science phenomenon. By making predictions, conducting an investigation, recording patterns, and explaining results with evidence, students learn both what soil contains and how scientists study materials.
Use the Soil Jar Observation Log to help students document each layer and communicate what they discovered.
Want to dig deeper into soil science? Explore earthworms, soil animals, decomposers, food chains, soil layers, and hands-on investigations with the complete Earthworms, Soil Animals & Decomposers Science Bundle for Grades 2–3. https://www.teacherspayteachers.com/Product/Earthworms-Soil-Animals-Decomposers-Science-Bundle-Soil-Habitat-Activities-16903675


Frequently Asked Questions About the Soil Jar Experiment
The soil jar experiment helps students discover that soil is a mixture of different materials. When soil is mixed with water and allowed to settle, students can observe differences in particle size, settling rate, and density. The activity also gives students practice making predictions, observing patterns, and using evidence to explain what they see.
Students learn that soil can contain sand, silt, clay, organic matter, water, air, and living organisms. They also learn that different soil particles settle at different rates. The investigation supports important science skills such as predicting, observing, recording data, comparing results, and constructing evidence-based explanations.
The investigation works best over two sessions. The first session takes approximately 30–40 minutes. The jars should then remain undisturbed overnight. The second session takes approximately 25–35 minutes, depending on how much time students spend observing, discussing, and recording their results.
Leave the jar undisturbed for at least 24 hours. Sand usually settles relatively quickly, while silt and especially clay can take much longer. If the water is still cloudy after one day, allow the jar to sit for another 24 hours.
A typical jar may show floating organic matter near the surface, followed by clay, silt, and sand from top to bottom. However, real soil samples do not always form perfectly distinct layers. The thickness and visibility of each layer depend on the composition of the soil sample.
Sand particles are generally larger and heavier than silt and clay particles. When the mixture is left undisturbed, gravity causes the larger mineral particles to settle more quickly toward the bottom of the jar.
Clay consists of extremely small particles. These particles can remain suspended in water for a long time before settling. This is why the water above a soil sample may remain cloudy even after the larger sand and silt particles have settled.
Lightweight organic materials such as small pieces of leaves, bark, or roots may float because they are less dense than the mineral particles or contain trapped air. Not all organic matter will float; some pieces may sink or remain mixed with the sediment.
Garden or schoolyard soil is usually a better choice. Commercial potting mixes often contain large amounts of organic material and other components that can make the sand, silt, and clay layers difficult to distinguish.
Different soils contain different proportions of sand, silt, clay, and organic matter. Soil collected from two locations may therefore produce noticeably different patterns. These differences are useful evidence for students because they show that soil is not the same everywhere.
Do not treat an unclear result as a failed experiment. The soil may contain a high proportion of one particle type, or the clay may simply need more time to settle. Let the jar sit longer or compare it with a sample from another location.
Yes, when appropriate classroom precautions are followed. Use clear plastic containers rather than glass, collect soil from a safe untreated area, keep the jar tightly closed while shaking, and have students wash their hands after handling soil. The teacher should supervise soil collection and shaking.
The investigation most directly supports NGSS 2-PS1-1 because students investigate and classify materials according to observable properties. It also provides opportunities to practice the Science and Engineering Practice of Planning and Carrying Out Investigations and the Crosscutting Concept of Patterns.
Yes. For Grade 3, the activity can serve as a review of observable material properties and as an introduction to Earth materials, soil composition, and scientific observation. Older or more advanced students can also measure and graph the thickness of the different layers.
Students can extend the investigation by comparing soils from different locations, measuring sediment layers, observing settling at different time intervals, or investigating how different soils affect water drainage. A related soil erosion investigation can also help students explore how water changes land and how erosion can be reduced.
The main conclusion is that soil is a mixture of different materials. When soil is mixed with water and allowed to settle, differences in particle size and other properties can cause the materials to separate into observable patterns. Students can use these observations as evidence that soil is not a single substance.
More Soil Education Resources for Teachers
https://www.nextgenscience.org/pe/2-ps1-1-matter-and-its-interactions?utm_source=chatgpt.com