How can young students understand water pollution without visiting a polluted river? Let them build a river model, observe changes, and test a solution. This water pollution experiment for kids turns an abstract topic into visible evidence. Students create model polluted water. Then they design and test a simple water filter.
The activity combines environmental science with engineering. It also makes an excellent Earth Day STEM activity for Grades 2–3.
Why Use a Water Pollution Experiment?
Young learners often imagine pollution as visible trash. However, pollution can take many forms.
Rainwater may carry soil, oil, fertilizer, litter, and soap. These materials can enter gutters and storm drains. From there, runoff may reach nearby rivers.
A classroom model makes this pathway easier to understand.
Students can observe cloudy water and floating pieces. They can also notice sediment collecting at the bottom.
Most importantly, they can investigate a solution.
The challenge is simple:
Can you design a filter that removes visible particles from model polluted water?
What Students Learn
This hands-on investigation helps students understand that:
- Runoff flows over land after rain.
- Runoff can carry pollutants into rivers.
- Pollution can change an aquatic habitat.
- Filter materials can trap some visible particles.
- Different filter designs produce different results.
- Clear-looking water is not always safe water.
- Engineers test and improve their designs.
Students also prac


Materials for the Water Filter STEM Experiment
Each student group will need:
- One clear plastic bottle
- One clear collection cup
- A stable bottle holder or ring stand
- A tray for spills
- Model polluted water
- Gravel
- Sand
- Cotton balls
- Filter paper or a coffee filter
- Mesh or screen material
- A measuring cup
- A spoon
- A timer
- Paper towels
- A recording sheet
- Pencils or crayons
An adult should cut the bottle before the lesson. Cover any sharp edges with strong tape.
Place the bottle upside down inside a stable holder. The bottle opening should point toward the collection cup.
The filter must not balance freely above the cup. It could tip during pouring.

How to Make Safe Model Polluted Water
Never collect real polluted water for this activity. Real water may contain harmful chemicals, bacteria, or other microorganisms.
Instead, prepare classroom-safe model water using:
- Clean tap water
- Dry soil
- Small pieces of clean paper
- Tiny pieces of leaves, if desired
Mix one large batch before the investigation. This keeps every test sample similar.
Stir the mixture before measuring each sample. Soil settles quickly at the bottom.
For the filter challenge, focus on visible particles. Soil and paper work well.
Oil, soap, and dissolved fertilizer behave differently. A simple classroom filter may not remove them.
Step 1: Introduce the River Problem
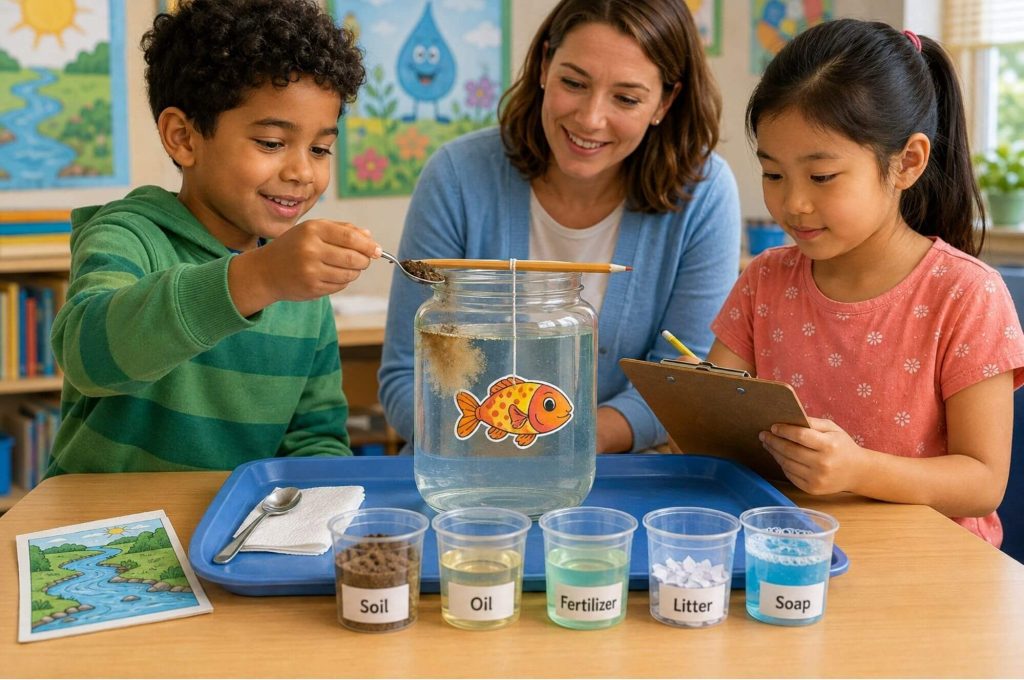
Begin with a clean jar of water.
Add a paper fish named Finn inside the jar. The jar represents Finn’s river habitat.
Ask students:
- What does Finn need to stay healthy?
- What might rainwater pick up from the ground?
- Where does water go after entering a storm drain?
- How could polluted runoff affect Finn’s habitat?
Add small amounts of model pollutants during the discussion.
Students should observe without touching or tasting the water.
This story-based introduction gives the experiment a meaningful purpose. Students are not simply filtering dirty water. They are helping protect Finn’s habitat.
Step 2: Observe the Model Water
Give each group a sample of model polluted water.
Ask students to observe:
- Water clarity
- Floating pieces
- Visible particles
- Sediment at the bottom
- Any layer on the surface
Students can draw the water before filtering.
Encourage specific observations.
Instead of writing, “The water is dirty,” students might write:
“The water is cloudy and has small paper pieces floating on top.”
That sentence provides useful evidence
Step 3: Plan the Water Filter
Show students the available filter materials.
Do not immediately provide the “best” layer order. The planning process is part of the investigation.
Students should choose their materials and draw a filter design.
Ask them to label each layer.
They should also predict what will happen.
A student prediction might be:
“I think the cotton will trap small soil particles.”
Another student may predict:
“Gravel will stop the larger pieces.”
There can be several reasonable designs.
However, small materials need support near the bottle opening. Cotton, mesh, or filter paper can prevent sand from falling through.
Step 4: Build the Filter
Place the bottle upside down in its secure holder.
Students add their chosen materials in layers.
A possible design might include:
- Filter paper near the bottle opening
- Cotton above the filter paper
- Sand above the cotton
- Gravel as the top layer
This is only one possible arrangement.
Students may choose a different order. Their results will help them evaluate the design.
Check that water can flow through the filter. Materials should not be packed too tightly.

Step 5: Test the Filter
Measure the same amount of model water for each group.
Stir the model water before pouring each sample.
Students slowly pour the water into the filter. They should start the timer immediately.
The filtered water collects in the cup below.
Students record:
- Filtering time
- Water clarity
- Number of visible particles
- Color changes
- Whether water flowed smoothly
- Whether the filter remained stable
They should compare the water before and after filtering.
How to Make It a Fair Test
A fair test keeps most conditions the same.
Each group should use:
- The same batch of model water
- The same amount of water
- The same filter holder
- Similar collection cups
- The same timing method
- The same observation categories
Students may change the filter materials or layer order.
When improving a design, they should change only one feature.
For example, students might add more cotton. They should not change the cotton, sand, and water amount together.
Changing one feature makes the results easier to explain.
What Does the Filter Actually Remove?
A classroom filter mainly uses physical filtration.
The materials act like nets with different-sized openings.
Gravel may stop larger pieces. Sand can trap smaller particles. Cotton and filter paper may catch fine sediment.
The filtered water may look clearer. It may also contain fewer visible particles.
However, the filter has important limitations.
It may not remove:
- Dissolved fertilizer
- Soap
- Oil
- Bacteria
- Viruses
- Other microorganisms
- Invisible chemicals
Clear-looking water is not necessarily clean or safe water.
Students must never drink the model water. They should wash their hands after the investigation.
Real water treatment uses several processes. These may include settling, filtration, and disinfection.
The classroom filter models only one part of that system.
Compare Two Filter Designs
The experiment becomes more powerful when students compare results.
They can test two designs using the same conditions.
Students might compare:
- Sand versus no sand
- Cotton versus filter paper
- Thick layers versus thin layers
- Two different layer orders
- Different amounts of one material
Ask students to make a claim:
“Design B worked better because fewer particles remained.”
Then ask for evidence:
“The water from Design B was clearer and had less sediment.”
This simple claim-and-evidence structure builds strong science communication skills.

Improve the Filter Design
Engineering rarely ends after one test.
Students should review their results and identify one problem.
Perhaps the water flowed too slowly. Maybe sand escaped through the bottle opening. Some visible particles may have remained.
Students then change one design feature.
They rebuild the filter and test it again.
Ask:
- What did you change?
- Why did you make that change?
- What stayed the same?
- Did the new design work better?
- What evidence supports your answer?
This improvement step transforms a demonstration into an engineering challenge.
Connect the Experiment to Earth Day
A water filter experiment provides a strong Earth Day message.
Students often want to “clean up” pollution after it happens. The filter challenge shows that cleanup can be difficult.
Preventing pollution is usually more effective.
Students can help protect rivers by:
- Picking up litter
- Keeping trash away from storm drains
- Planting vegetation near bare soil
- Using only the fertilizer plants need
- Reporting leaking vehicles to an adult
- Cleaning oil spills safely
- Using car washes that collect and treat wastewater
- Never pouring chemicals into gutters
- Saving water at home and school
Small actions can protect entire habitats.
A single piece of litter may seem harmless. Rain can carry it toward a storm drain. That drain may lead directly to a river.
Discussion Questions
Use these questions before or after the experiment:
- Which filter material trapped the largest pieces?
- Which material trapped fine soil?
- Why did some water remain cloudy?
- Did clearer water mean safe water?
- Which design worked best?
- What evidence supports that claim?
- How could you improve the filter?
- How can people prevent pollution before it reaches rivers?
These questions work well during science circles or partner discussions.
Supporting Different Grade Levels
Kindergarten and Grade 1
Focus on observing and comparing.
Students can draw the water before and after filtering. Use words such as clear, cloudy, cleaner-looking, and particles.
An adult should build and pour the filter.
Grades 2–3
Students can plan, build, test, and record results.
They can compare designs and write simple evidence statements.
This is the ideal level for the complete Finn investigation.
Grades 4–5
Add measurements and controlled variables.
Students can measure water volume and filtering time. They can graph results or calculate average filtering times.
Older students can also research municipal water treatment.
NGSS Connections
This activity supports several elementary engineering practices.
Students:
- Define a problem
- Plan a possible solution
- Build a model
- Test the model
- Compare results
- Improve one design feature
- Communicate with evidence
The investigation connects naturally with K–2 Engineering Design and 3–5 Engineering Design expectations.
It also supports lessons about human impacts, runoff, erosion, habitats, and environmental protection.
Turn the Experiment Into a Complete Mini-Unit
The filter challenge works well as a standalone Earth Day activity.
It becomes even more meaningful when students first investigate runoff.
The complete Finn’s River Investigation Mini-Unit guides students through the entire learning sequence.
Students meet Finn, predict runoff pathways, observe model pollution, identify pollution sources, and explore solutions. They then complete the hands-on water filter STEM challenge.
Teacher preparation notes, safety reminders, recording pages, assessments, and answer guidance are included.
Quick Quiz
- What is runoff, and what can it carry into a river?
- Why can filtered model water still be unsafe to drink?
- What should an engineer change when improving a fair-test filter design?
Frequently Asked Questions
The complete mini-unit is designed for Grades 2–3. Younger students can complete the observation activities with adult support. Grades 4–5 students can add measurements, graphs, and controlled variables.
Students investigate how filters trap some visible particles. They plan, build, test, compare, and improve a filter design. They also learn that clearer-looking water is not necessarily safe water.
The full unit can be taught across four to six sessions. Most sessions take about 30–45 minutes. The filter challenge may require one longer lesson or two shorter sessions.
Students need a plastic bottle, stable holder, collection cup, tray, and model polluted water. Filter choices include gravel, sand, cotton, mesh, and filter paper. Measuring tools, timers, towels, and recording sheets are also helpful.
Use clean tap water, dry soil, and small pieces of clean paper. Tiny dry leaves may also be added. Mix one large batch so every group receives a similar sample.
No. Real environmental water may contain harmful chemicals or microorganisms. Always use clean water mixed with classroom-safe model materials.
No. The filter may remove soil, litter, and other visible particles. It may not remove dissolved chemicals, oil, soap, bacteria, viruses, or other microorganisms. Students must never taste the model water.
A simple classroom filter cannot reliably remove these pollutants. They may be included in a teacher-led pollution demonstration. For the student filter challenge, soil and paper provide clearer, safer observations.
Yes. This experiment works especially well during Earth Day and environmental science lessons. It helps students connect pollution prevention with protecting rivers and aquatic habitats.
Yes. Teams of three or four students work well. Students can share the roles of materials manager, builder, pourer, timer, and recorder.
Yes. The resource includes answers for fixed-response activities and guidance for open-ended questions. Investigation results may vary because students create different filter designs.
The mini-unit supports elementary engineering design practices. Students define a problem, plan a solution, build a model, test it, compare evidence, and improve the design. It also supports instruction about runoff, habitats, erosion, and human impacts on the environment.
Related Water Pollution and STEM Resources
Use these trusted resources to extend your water pollution, runoff, and filtration lessons:
- Surface Runoff and the Water Cycle – U.S. Geological Survey
Explore how rainwater flows downhill and becomes part of the water cycle. - Basic Information About Nonpoint Source Pollution – U.S. Environmental Protection Agency
Learn how runoff carries soil, fertilizer, oil, and other pollutants into waterways. - Types of Nonpoint Source Pollution – U.S. Environmental Protection Agency
Find examples of pollution from neighborhoods, roads, farms, and other land areas. - Soak Up the Rain: What’s the Problem? – U.S. Environmental Protection Agency
Discover ways communities can reduce runoff, erosion, and stormwater pollution. - How Water Treatment Works – Centers for Disease Control and Prevention
Review how real treatment plants use settling, filtration, and disinfection. - About Choosing Home Water Filters – Centers for Disease Control and Prevention
Explain why different filters remove different substances and why clear water may still be unsafe. - Earth Day Education Resource Library – EARTHDAY.ORG
Find additional environmental lessons, toolkits, and classroom action projects.