How can a cactus survive for weeks—or even months—with very little rain? One important adaptation is its waxy outer covering, called a cuticle. This thin protective layer helps slow water loss from the plant’s surface.
In this simple cactus adaptations STEM experiment, students use two cups of water to model what happens when a surface is protected by a covering. The investigation uses inexpensive classroom or kitchen materials, takes only a few minutes to set up, and gives students a clear way to observe evaporation over time.
This activity works especially well for students in Grades 2–3 during lessons about desert habitats, plant adaptations, evaporation, structure and function, or fair testing.

Investigation Question
How can a surface covering slow water loss?
What Students Will Learn
During this investigation, students will:
- model how a cactus’s waxy cuticle helps conserve water;
- compare evaporation from covered and uncovered surfaces;
- identify the variable changed in a fair test;
- make a prediction and record observations;
- compare water levels after 24 and 48 hours; and
- use evidence to explain the results.
Materials Needed
For each pair or small group, gather:
- two identical small, clear cups;
- water;
- a 1/4-cup measuring cup;
- plastic wrap;
- one rubber band;
- masking tape or sticky labels;
- a permanent marker;
- a ruler or kitchen scale, optional; and
- a science notebook or recording sheet.
Using identical cups is important. Different cup shapes or opening sizes could affect the rate of evaporation and make the results harder to compare.
Time Needed
- Setup: About 15 minutes
- First observation: After 24 hours
- Final observation: After 48 hours
- Optional extension: Continue for one additional day if the change is difficult to see
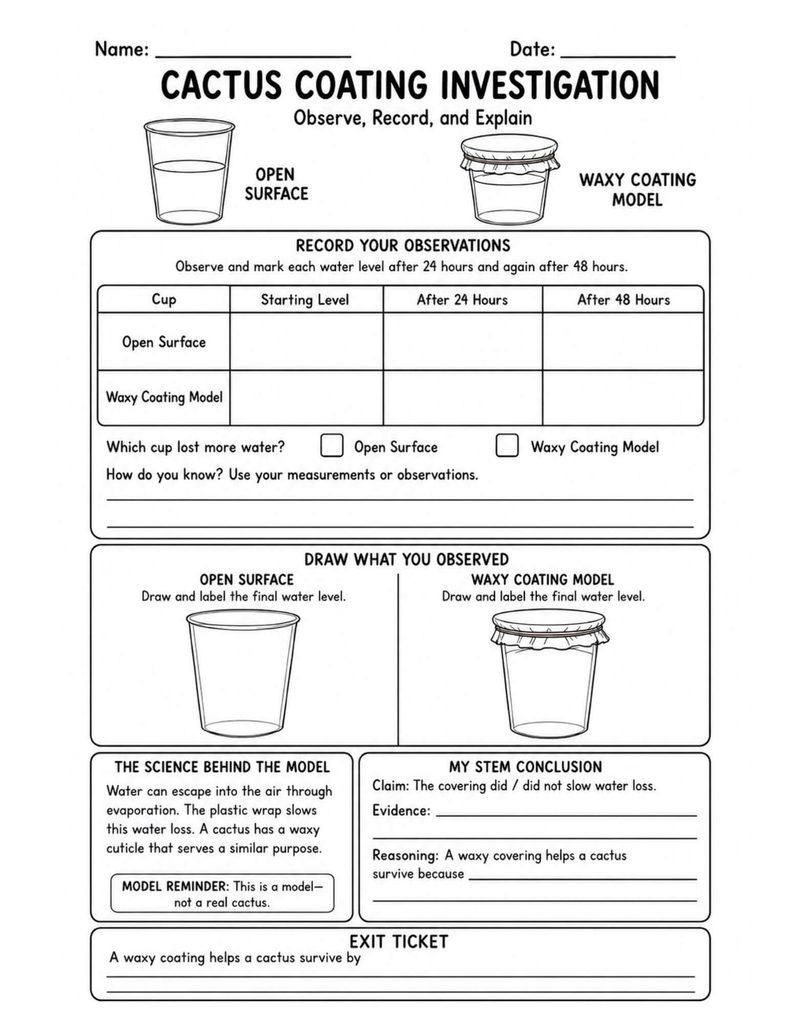
Step-by-Step Cactus Waxy Coating Experiment
Step 1: Label the cups
Place a piece of masking tape or a sticky label on each cup.
Label the first cup Open Surface.
Label the second cup Waxy Coating Model.
Explain that the second cup will represent the protected outer surface of a cactus.
Step 2: Measure equal amounts of water
Measure 1/4 cup of water and pour it into the Open Surface cup.
Measure another 1/4 cup of water and pour it into the Waxy Coating Model cup.
The starting amounts must be equal so that the comparison is fair.
Step 3: Mark the starting water levels
Place both cups on a flat surface. Look at each cup from the side at eye level.
Use a permanent marker to draw a small line at the top of the water in each cup. Label this line Start or record the starting level on the student sheet.
If students are using a ruler, they can measure the distance from the bottom of each cup to the waterline. If using a kitchen scale, record the starting mass of each complete setup.
Step 4: Cover the Waxy Coating Model
Stretch a piece of plastic wrap tightly across the top of the Waxy Coating Model cup.
The plastic should cover the entire opening. Smooth it across the rim so there are no large gaps.
Step 5: Secure the covering
Place a rubber band around the cup just below the rim. Check that it holds the plastic wrap securely in place.
The plastic wrap represents the protective barrier created by a cactus’s waxy cuticle. It is only a model—the wrap is much thicker and more complete than the cuticle of a living plant.
Step 6: Leave the Open Surface cup uncovered
Do not place plastic wrap, a lid, or any other covering on the Open Surface cup.
The covering should be the only condition that is different between the two setups.

Step 7: Place both cups in the same location
Set the cups next to each other in a warm, safe place where they will not be moved.
Keep both cups under the same conditions. They should receive the same light, room temperature, airflow, and observation time.
Keep the cups away from stoves, pets, busy work areas, and places where they could be knocked over.
Step 8: Make a prediction
Ask students:
Which cup do you predict will lose more water? Why?
Students should record their predictions before observing any changes. Encourage them to explain their thinking rather than simply naming a cup.
Step 9: Check the fair test
Help students identify the variables in the investigation.
- What will we change? Whether the cup has a surface covering
- What will we observe or measure? The change in water level or mass
- What should stay the same? The cups, starting amount of water, location, temperature, airflow, and amount of time
This quick discussion helps students understand that a useful comparison changes only one condition at a time.
Step 10: Observe after 24 hours
After 24 hours, examine both cups without removing the plastic wrap.
Students should:
- mark each new water level;
- record the levels in the observation table;
- measure the change, if possible; and
- note any droplets under the plastic wrap.
Droplets inside the covered cup are condensed water. That water has changed from liquid to vapor and back to liquid, but it is still trapped inside the model.
Step 11: Observe again after 48 hours
Repeat the same observations after 48 hours.
Students should mark and record both water levels again. Remind them to view the cups from the side at eye level so their observations are consistent.
Step 12: Compare the results
Ask students to compare the starting level, the 24-hour level, and the 48-hour level for each cup.
Useful questions include:
- Which cup lost more water?
- How did the water level in each cup change?
- What evidence supports your answer?
- Did the results match your prediction?
- Why was it important to keep the cups together?
The uncovered cup will usually show a greater decrease in water level. The covered cup may show very little change because the plastic barrier slows the movement of water vapor into the surrounding air.
Step 13: Write a conclusion
Students can organize their conclusion using a simple claim-evidence-reasoning structure.
Claim: The covering did or did not slow water loss.
Evidence: Describe or compare the observed water-level changes.
Reasoning: Explain how the observations show that a surface barrier can reduce evaporation.
A sample student conclusion might be:
The covering slowed water loss. The uncovered cup had a lower water level after 48 hours, but the covered cup changed very little. The plastic wrap kept more water vapor from escaping into the air.

The Science Behind the Model
Evaporation happens when water molecules at the surface of a liquid gain enough energy to escape into the air as water vapor. In the uncovered cup, the water surface is directly exposed to the surrounding air, so water vapor can move away from the cup.
The plastic wrap forms a barrier over the second cup. It greatly reduces the movement of water vapor from the cup into the room. As a result, less water leaves the covered setup.
A cactus has a waxy cuticle covering its outer surface. This cuticle helps reduce water loss in a dry environment. It does not seal the cactus as completely as plastic wrap seals a cup, but it serves a similar protective purpose.
Remember: This Is a Model
The cups help students investigate one part of cactus survival, but they are not real plants.
A living cactus:
- stores water in thick, fleshy stem tissue;
- has tiny pores for gas exchange;
- uses its green stem to carry out photosynthesis;
- often has spines instead of large, flat leaves; and
- uses roots to absorb water from the soil.
The investigation isolates one idea: a surface covering can slow water loss.
Connect the Experiment to Other Cactus Adaptations
After the investigation, invite students to examine how several cactus structures work together.
Spines
Cactus spines are modified leaves. Their tiny surface area helps reduce the amount of water that would be lost from large, flat leaves. Dense spines can also cast small areas of shade, disturb airflow near the stem, and help protect the plant from animals.
Shallow, spreading roots
Many desert cacti have roots that spread across a wide area near the soil surface. These roots can quickly absorb water from brief desert rains before much of it evaporates or drains away.
Thick, ribbed stems
A cactus’s fleshy stem stores water. Its ribs allow the stem to expand after rain and contract as the stored water is used.
Green stems
Because cacti do not have large leaves, their green stems carry out photosynthesis and produce food for the plant.
Quick Assessment Questions
Use these questions for partner discussion, a science notebook response, or an exit ticket:
- Which desert challenge does a cactus’s waxy coating help solve?
- How can hiding in a burrow during the day help a desert animal conserve water?
- Choose one adaptation that could help an animal survive in a cold desert: thick fur, a layer of fat, or a sheltered burrow. Explain how it would help.
Troubleshooting the Investigation
What if the water levels look the same?
Wait one more day. Evaporation rates depend on temperature, airflow, humidity, and the width of the cup opening. Wider cups usually show a visible change sooner because more water is exposed to the air.
What if water droplets appear under the plastic wrap?
This is expected. Water evaporated inside the cup and then condensed on the cooler plastic. The droplets remain within the covered system.
Can students use a ruler?
Yes. Students can measure from the bottom of the cup to each waterline. The same student should measure each time, using the same side of the cup and the same method.
Can students use a kitchen scale?
Yes. Record the mass of each complete setup at the beginning and at each observation time. Do not remove the plastic wrap or rubber band before weighing the covered cup.
Classroom Safety
Use clean water and unbreakable cups. Do not allow students to drink the investigation water. Clean spills promptly, and keep the cups away from electrical equipment, stoves, pets, and high-traffic areas.
Why This Cactus STEM Activity Works
The investigation makes an invisible process easier to observe. Students cannot see individual water molecules escaping, but they can see and measure the resulting change in water level. The two-cup comparison also provides a simple introduction to fair testing, variables, data collection, and evidence-based explanations.
Most importantly, students connect a hands-on result to a real plant adaptation. The cactus’s waxy cuticle is no longer just a vocabulary word—it becomes a structure with a clear survival function.
Looking for more hands-on STEM activities? Explore more engaging science investigations your students will love!
Hidden Colors in Leaves: A Simple Leaf Chromatography Experiment for Kids https://lolliartscience.com/2026/08/08/leaf-chromatography-experiment-for-kids/
Bread Mold Experiment for Kids: A Simple 5-Day Science Activity – Perfect Mold Growth Science Fair Projecthttps://lolliartscience.com/2026/07/18/bread-mold-experiment-for-kids/
Water Pollution Experiment for Kids: A Hands-On STEM Filter Challengehttps://lolliartscience.com/2026/08/21/water-pollution-experiment-for-kids/